macOS Hidden Treasures: Batch-Rename Items in the Finder – TidBITS
When I was preparing inline graphics—the little images embedded in a line of text—for my Take Control of Numbers book, I was almost finished when I remembered that the filenames needed to adhere to a naming convention: they must end with _inline. Nearly 50 files needed renaming. A brief mental facepalm moment was followed by the relieved realization that the Finder could do it for me with its batch-rename capability.
You didn’t know the Finder has a batch-rename capability? That’s because the option is disguised as a seemingly useless Rename command in the File menu. After all, you can rename a file by clicking and typing. So, the Rename command has no reason to exist—until you’ve selected multiple items. Then, it changes to Rename [X] Items (identifying the number of selected items). But how would you know that since you aren’t likely to peruse menus after you’ve selected a bunch of files or folders?
And that’s how you start: select multiple items in any window view (including, if you need to, a mix of files and folders) and choose File > Rename [X] Items. (For the rest of this article, I’ll refer to the command as simply Rename Items.)
The Batch-Rename Triad
When you choose Rename Items for a selection, a dialog appears. (If you’re working in a window, it slides out from the title bar; if you’ve selected items on the desktop, you get a free-floating version.)
Its pop-up menu offers three options:
- Replace Text: Change any part of the existing filename to some other text. This option also lets you delete characters from filenames by replacing the existing text with nothing.
- Add Text: Add text before or after the filename.
- Format: Append an index or counter number (the latter uses leading zeros for a fixed number of digits) or the current date and time to the filename. You can place the number before or after the filename, replace the filename with different text, or obliterate the original name completely.
We’ll take a look at each of these options in action.
Replace or Delete Filename Text
How many files do you have whose names start with IMG_? Every time you dump images from your camera to your Mac, they’re named with that prefix, followed by a 4-digit number. Replace those leading characters with a descriptor so that you’ll know what’s what:
- In the Finder window with the photo files, choose Edit > Select All, and then File > Rename Items.
- Choose Replace Text from the dialog’s pop-up menu.
- In the Find field, enter IMG_.
- For Replace With, enter a description: Pool Party, Graduation, Disney World, or whatever. Be sure to include a trailing space or some other separator after the text. (Alternatively, set only IMG to be replaced, leaving the underscore.)
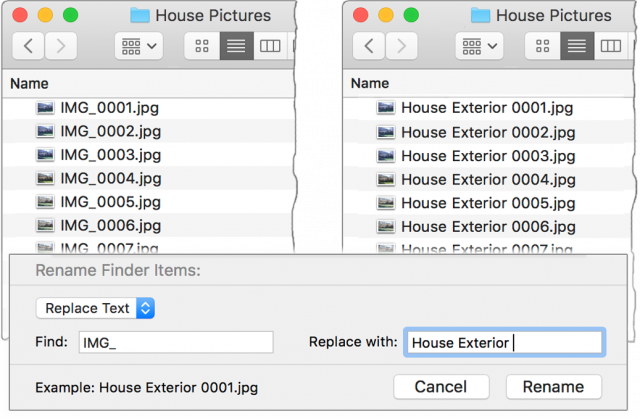
- If the example in the lower left of the dialog looks right, click Rename.
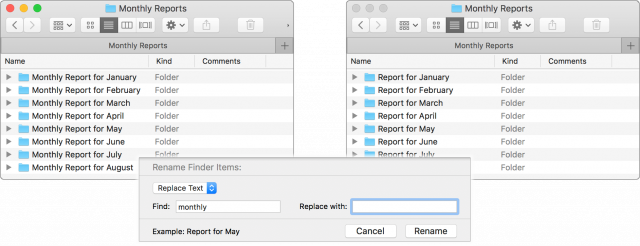
Have you ever wound up with a bunch of montly reports scattered among your monthly ones, or some similarly repeated typo? To replace montly with monthly:
- Select the target files and choose File > Rename Items.
- Choose Replace Text from the pop-up menu.
- In the Find field, type montly; in Replace With, type monthly. Or, use shorter text replacement, such as substituting tly for thly as long as it wouldn’t interfere with other text in the filenames.
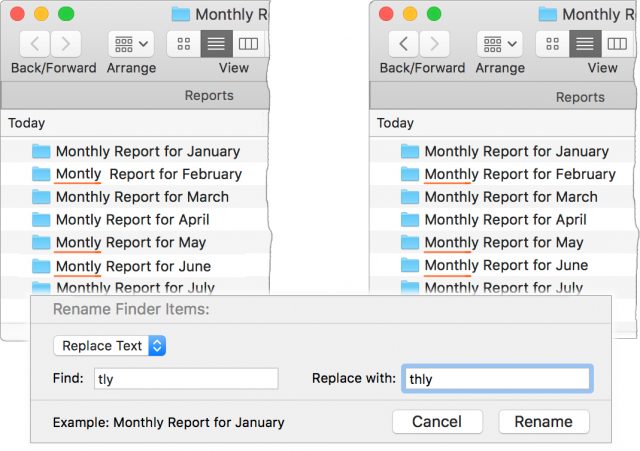
You might be tempted to use the even briefer change of ly to hly; with that approach, however, if some of the files were correctly named to begin with, they would wind up with an extra h—monthhly. I recommend using full words to avoid problems that you might not notice while they’re still easily undo-able—although I confess this is a case of “Do as I say, not as I do.” If it’s too late to undo the mistake, it’s usually a cinch to do a second, more careful, batch rename to correct the issue. (Undo details are in the “Quick Tips” list at the end of this article.)
You can also use the Replace Text option to delete text from a filename: simply enter the delete target in Find, and leave Replace With blank. So, if you’ve decided that Monthly Report for January and its subsequent files are a tad redundant, set Find to monthly—making sure to include the trailing space—and leave Replace With empty.
There’s another example of deleting filename text ahead, under “Multiple-Pass Renaming.”
Add Text to Filenames
The Add text option in the Rename dialog lets you—you guessed it!—add text to the beginning or end of the filename: choose Add Text from the menu, type the additional text, and specify whether it goes before or after the name.
This is what I used to append _inline to my graphics, the issue I mentioned at the beginning of this article. You might find that you need to add a project name to a group of files, or that you forgot to append your initials to revisions of shared documents. Here’s how to make a simple adjustment like this:
- Select the target files.
- Choose File > Rename Items.
- In the dialog, choose Add Text from the pop-up menu, type the text, and choose Before Name or After Name from the second pop-up.
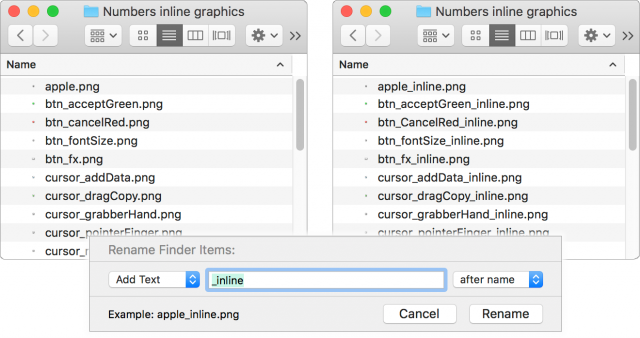
- Click Rename.
As you can see in the screenshot above, an “after name” addition ignores the file extension (.png) because it’s not considered part of the file’s name.
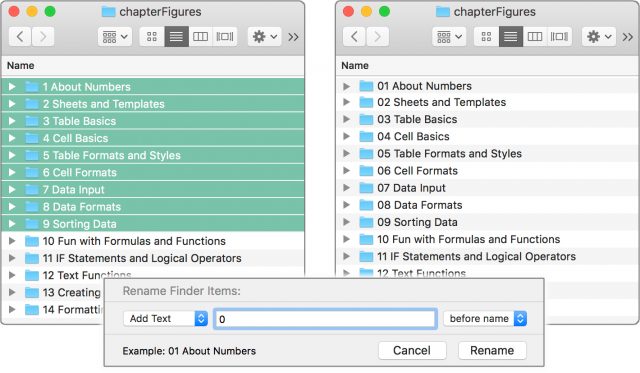
I frequently use this method to add leading zeroes to the beginning of single-digit numbers so I can more easily scan the then-even text in a list of numbered filenames. With just the single-digit files selected, I set the Rename option to Add Text, type a zero in the text field, and choose Before Name from the second menu.
Format Filenames with Numbers or Dates
The Format menu choice in the Rename dialog is not a shining example of nomenclature, for either its title or its contents. Your formatting options are:
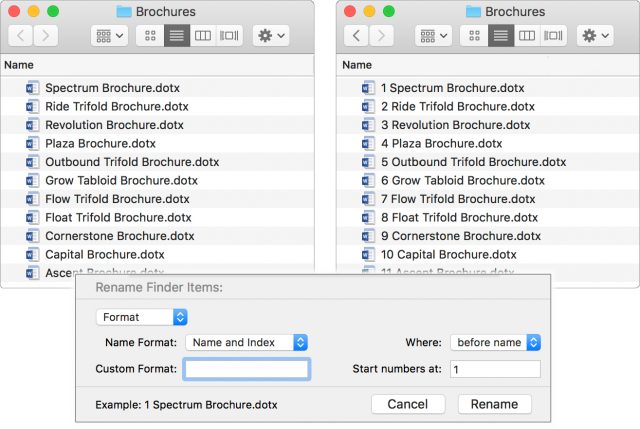
- Name and Index: Adds consecutive numbers, starting at 1 or a number you specify.
- Name and Counter: Adds consecutive numbers, also starting at 1 or a specified number, but creates five-digit numbers by padding with leading zeroes where necessary: 00001 and 00237, for example.
- Name and Date: Adds the current date, as well as the time, down to the nearest second, in the format 2018-05-23 at 9.27.55 AM.
With each of these options, you can keep or replace the original filename, using the awkwardly named Custom Format field. Oddly, it usually starts with File as the default suggestion (without even the courtesy of a leading space, as you can see in the dialog’s Example line in this picture).
To replace the current filenames with a common name—so, for instance, only an index or counter number differentiates them (Field Test 1, Field Test 2)—enter that name in the Custom Format field. If you want the original name left intact, the Custom Format field must be blank, as shown in this picture.
It’s not immediately apparent how either of the numbering options is applied to selected files. Here’s the trick: when you’re working in a List view that has the names in the first column, as is nearly always the case, the numbers are applied, in order, to those names. No surprise there, but the controlling factor is actually the window’s sort order—Dated Created, say, or Size—which, of course, affects the order of the names. So make sure to get your files in the right order before renaming them.
Multiple-Pass Renaming
Sometimes renaming requires more than one pass: altering the name, then adding a date, and finally deleting the timestamp that accompanies the date, for instance. But edits are simple to set up and take only seconds to run, so multiple passes are not time-consuming procedures.
Reword Filenames
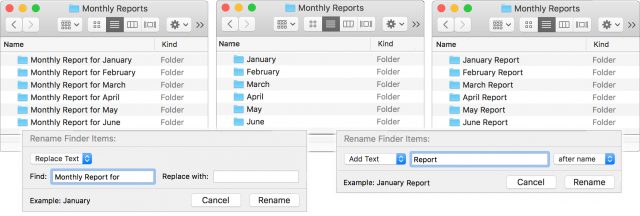
If your files are named Monthly Report for [Month], and you’d prefer them to be [Month] Report, run them through the rename mill twice, first stripping Monthly Report for, and then adding Report to the end of the filenames:
- Select the target files and choose File > Rename Items.
- Choose Replace Text from the pop-up menu and type Monthly Report for (including a trailing space) in the Find field. Leave Replace With blank, and click Rename. The files are now named with only the month.
- With the files still selected, choose File > Rename Items again. Choose Add Text from the pop-up menu and type Report in the text field; choose After Name from the second pop-up, and click Rename.
Strip the Time from Date & Time
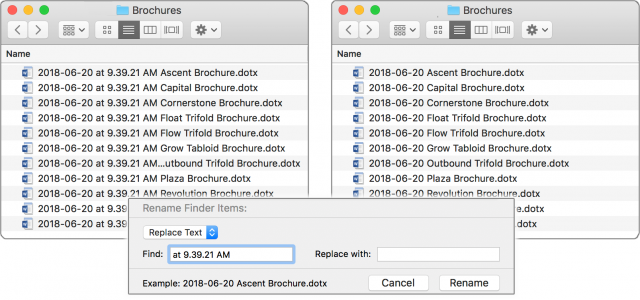
I firmly believe that the application of a date stamp should be separate from a timestamp, but Apple failed to consult me on the matter. Luckily, it’s easy to strip out the time:
- Get the exact wording of the timestamp portion of the renamed files by copying it from one of the filenames: select one of the files, activate its name by clicking it or pressing Return, and drag across the timestamp portion, including the “at” but leaving the leading or trailing space.
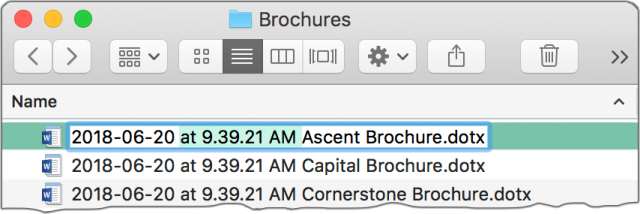
- Select all the target files and choose File > Rename Items.
- Choose Replace Text from the pop-up menu.
- Paste the copied timestamp into the Find field, and leave the Replace With field blank.
- Click Rename.
Quick Tips
Here are a few more things you should know:
- Quick access to the Rename command: Tired of heading way up to the File menu for the Rename Items command? I have three solutions for you. Control-click any one of the selected files for a contextual menu that includes the Rename command, use the Action menu (the gear
 icon) in the window’s toolbar, or… the third gets its own tip, next.
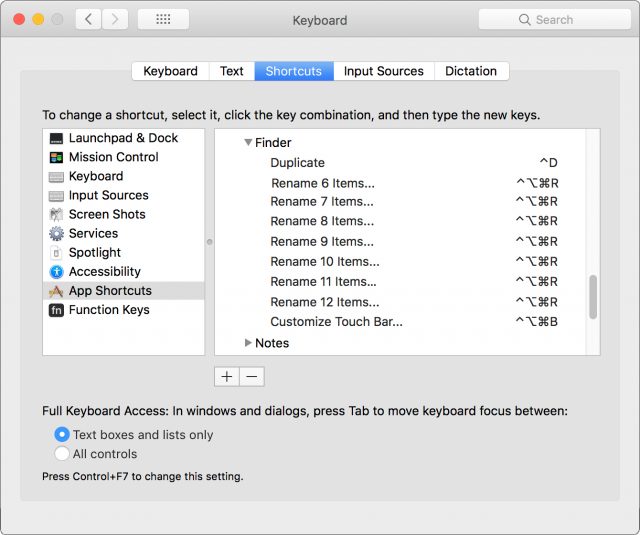
 - Keyboard shortcut for the Rename command: If you use the Rename command frequently and are the type of person who prefers keyboard commands, then you’ll be disappointed when you realize that you can’t set up a keyboard shortcut for a command whose wording constantly changes (Rename 4 Items, Rename 12 Items…). Except that you can—in a roundabout sort of way: set up shortcuts for many different versions of the command and assign all of them the same shortcut. (Who knew? I didn’t, until I decided to try it for this because I prefer keyboard shortcuts for almost everything.) The method is no different from setting up other keyboard shortcuts:
- Go to System Preferences > Keyboard > Shortcuts and click App Shortcuts in the app list.
- Click the + button beneath the shortcut list and choose Finder from the pop-up menu in the dialog box. (If Finder is not in the shortcut list already, this procedure adds it; if it’s already listed, you still need to select it as the target.)
- In the Menu Title field, type Rename 6 Items…. (You don’t have to use the ellipsis character—typed with Option-semicolon—you can simply type three periods.)
- Go to the Keyboard Shortcut field and press the key combination you want to use.
- Repeat this process for other numbers of files in the command name, using the same key combination.
I’ve found that System Preferences occasionally objects to the use of the same shortcut for multiple commands, but only mildly: sometimes not all the commands are listed correctly in its window, showing only an ellipsis (…) in place of the command name. But the shortcut keys remain displayed, the command names return on a subsequent opening of System Preferences, and all the shortcuts work in the meantime, so it’s only a minor glitch.
- Case insensitivity: In the Rename dialog box, the text you enter that is going to be replaced or erased is case insensitive—that is, upper- and lowercase letters are considered the same. But any replacement text will be used exactly as you type it.
- Undo a rename mistake: Whether you inadvertently introduced a typo while renaming files, chose the wrong option (counters instead of serial numbers, say), or realized the renaming just isn’t what you want, you can use the Edit > Undo command to reverse the changes. If you change your mind about that, there’s Edit > Redo to the rescue. You can even go through several undo levels: if you added a serial number to the beginning of the file, and then a corrected project name to the end, you can undo each in turn to get back to the original filenames. Even if you’ve closed the window and opened others, you can go back to the folder of renamed files and undo the changes. There are some restrictions, of course, such as not having done anything undoable someplace else in the Finder.
via TidBITS
March 25, 2023 at 07:25AM

